I already explained how The Cloud is just someone else’s computer, so you should already be suspicious about any service that offers cheap and easy storage for anything. The classic security trilemma is you cannot easily make a service secure, easy, and cheap at the same time. The typical cloud tradoff is to compromise security for cost and simplicity.
If you’ve used Google Drive, for example, you’ve seen how simple it is to send a file up to Google then access/share it later. The downside to this convenience is that files stored on Google Drive are unencrypted and ripe for analysis and targeting by Google.
If you’re using Apple’s iCloud instead, you’re a little better off. iCloud at least encrypts the cloud data, but their recent introduction of CSAM Monitoring should give you pause. Once this is rolled out, your iPhone will scan all files on your local device, generate a checksum or cryptographic hash, then upload them to iCloud as usual. This allows them to maintain iCloud encryption but still spy on you at the device level.
I don’t have an iPhone, but if I did this would spur me to find an alternative.
Cloud Storage Options
The common cloud storage providers are, in no particular order:
- Dropbox
- Google Drive
- Apple iCloud
- Microsoft OneDrive
- Amazon S3
These services offer a mixture of encryption types, which I will briefly summarize below.
Encryption in Transit
You often see claims of security because your data is “encrypted in transit”. This is a laughable claim, because it’s trivial to secure a data stream using SSL/TLS. All “encrypted in transit” means is that nobody can snoop on your data while it’s being transferred to or from the cloud provider.
The same thing is true of the data being sent to and from this website. You’re viewing this post after it was “encrypted in transit”. Once it reaches you, the post is in its full unencrypted glory and you’re free to do whatever you like with it.
You can send files “encrypted in transit” all day, but if the cloud provider stores them as-is (unencrypted), you have zero privacy or security.
Encryption at Rest
This is a more useful encryption method for our purpose. Encryption at rest refers to the storage layer for your data. If you have a modern phone, you likely have storage that is encrypted at rest. This means that all data written to the storage medium is encrypted. It is unlocked at system start by a password, fingerprint, private key, or some other secure input.
This is useful to us in the sense that theft of the device does not expose us to data theft, assuming the thief does not have access to the key used to encrypt the storage.
The temptation is to think “oh, it’s secure at the storage layer, I’m good!” but consider this example. I have a workstation, fully encrypted at the storage layer. I boot it up, unlock it with my private key, and then someone breaks into my house and threatens me. They sit down at my computer and can access my files, since they are fully unlocked and will remain so until the system is powered off or if my login session is stopped.
Encryption in Use
Encryption in use gets closer to our ultimate desire. It is a technique, mostly employed at the provider level, to ensure that data moving between systems is not exposed. These can be different systems in a data center or different processes on the host itself.
This is a best practice, and there’s not much you can do about enforcing this.
Best of Breed
The solution I utilize protects me from almost any issue at the cloud provider level. I pre-encrypt my data at the system level, then feed that encrypted data to the cloud storage provider. In this way, I do not care what data practices they employ at their data center. Even if they keep data unencrypted at the storage level, they only have read access to a bunch of my pre-encrypted data. And since everyone supports encryption in transit, I’m protected along the chain.
Hoorah!
You can use several programs for pre-encryption, but the one I prefer is Duplicati. It encrypts with AES-256 and provides incremental backups and native data deduplication. This means that you’re only backing up changes to files, instead of full copies each time, and any duplicate data will be identified and scrubbed to save space. It’s designed for online cloud storage backup, and it’s accessible from a web front end (ease of use is important). And of course it’s open source.
Cloud Storage Provider
Since my data is pre-encrypted, I can shop around for good deals on storage space. The best I’ve found is Backblaze B2. At the time of writing, they charge $0.005/GB/Month, plus transfer fees depending on use. I have roughly 470 GB stored, which is about $2.50/month. Nice deal!
If you have less intense requirements, feel free to explore any of the Duplicati-supported backends.
Remember, since Duplicati encrypts backup data prior to transit, you can use “insecure” providers like Dropbox or Google Drive.
System Notes
The rest of this guide will be useful if you store your files on a system providing network-attached storage (NAS), since your important data will be stored in one place and easily managed by Duplicati.
If you’re using multiple systems you’ll still be OK, but you need to explore installation of sevearl local clients instead of managing your backups from a central server.
Setting up Backblaze B2
Navigate to Backblaze and sign up. You get the first 10 GB free, so you can test it out before committing.
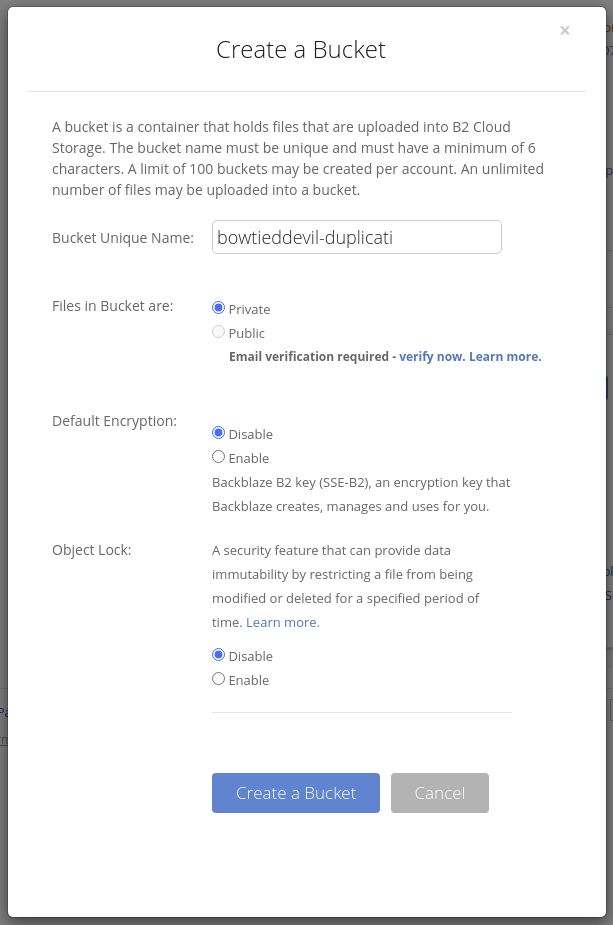
Once you’ve signed up, navigate to Buckets and create a new one. A bucket is the B2 name for a pool of storage. It is associted with a particular user and key, so these cannot be modified without credentials.
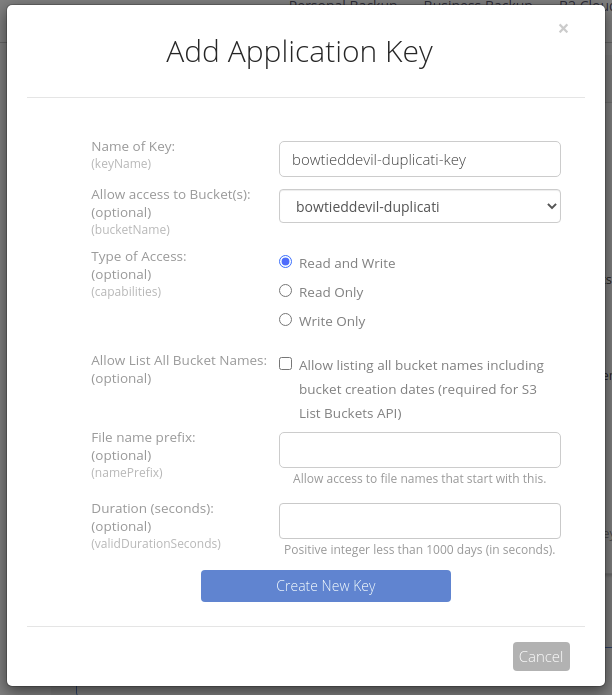
Then navigate to App Keys, generate a new Master Key, and then an AppKey for Duplicati to use.
Write the key down, it cannot be shown again! If you lose it, delete and re-create it.
You can also choose a custom retention option, if you’d like. I set my retention to “Keep only the latest version”, since Duplicati will manage remote backup versioning.
Installing Duplicati
Duplicati is available in several formats including Fedora/RedHat (RPM) and Ubuntu/Debian (RPM). They also provide an official Docker container, which naturally I use.
Here’s how to get it wired up.
Create a docker-compose.yml file with the following contents:
version: "2.2"
services:
  duplicati:
    image: duplicati/duplicati:latest
    container_name: duplicati
    hostname: duplicati
    restart: unless-stopped
    ports:
      - "8200:8200"
    volumes:
      - data:/data
      - /path/to/files:/backups/dir1

volumes:
  data:
Edit the second volume to the appropriate directory containing your files.
Then bring up the service with docker-compose up -d and view the webpage at http://[host ip]:8200.
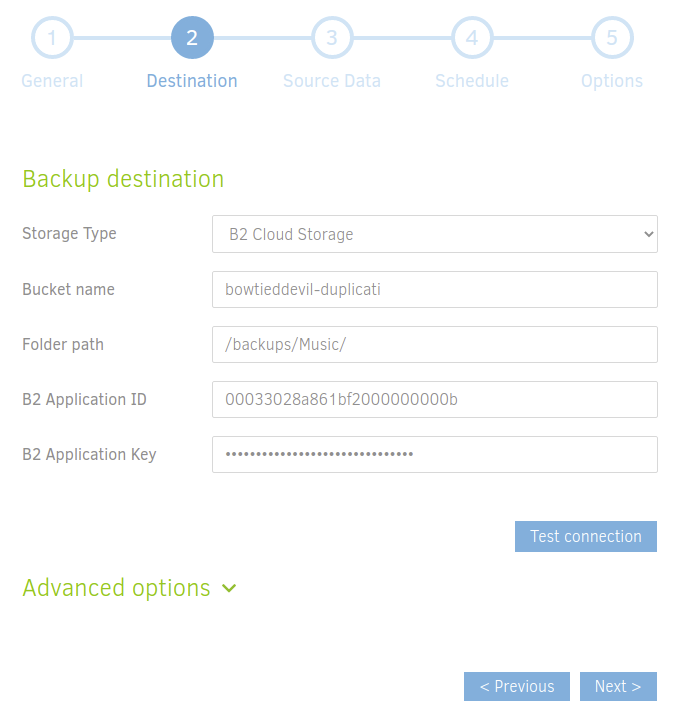
If that works without trouble, you can begin the process by choosing Add backup, entering the path to your data (see the volumes section above), and entering/generating a passphrase. Save this passphrase somewhere secure!
Then it’s a simple task to choose B2 Cloud Storage for your remote option, provide the applicationKey and keyID from Backblaze, then set your retention and backup frequency options.
Simple as that.