In Sending Email, we learned how to get email from our server and onto the Internet using Mailgun. Now we will learn how to receive and store email.
Luckily I covered a lot of the technical aspects of email deliver in that post, so this one will be more straightforward.
Why Bother?
Porkbun provides free email forwarding for up to five users, so why not just use that? For low-volume personal uses this is a fine solution. But for users who intend to interact with others through email, a forwarding service is a bad idea.
Here’s why — Imagine that I have an email forward through Porkbun. It relays all email to [email protected] to another address [email protected] (note: these are both valid email addresses, email me anytime!). If you send an email to me at [email protected], it will be forwarded to my ProtonMail account. If I respond to it, you will see the response from my ProtonMail account. Maybe that’s OK if you know and trust me, but if you’re running an online store, a consulting business, or running a mailing list, you had better be careful! A strange reply from another email address could make your customers jumpy.
Not to mention you’ve created two points of failure. Either Porkbun or ProtonMail could have an outage, rendering you unable to receive email when your server is otherwise ready to go.
And one more thing. If you aren’t storing the email messages directly, someone else is. You should never send sensitive information over email anyway, but there is plenty of business being conducted through email. If you don’t control its receipt and storage, you’ve created counter-party risk.
No surprise here, I recommend learning how to operate your own email server!
The Traditional Email Stack
Receiving email is a two-part process. The actual receipt of an email message is handled by an SMTP server, and the storage and management of that email is handled by an IMAP server. See the previous post for more info on these protocols.
Here’s the broad picture: SMTP receives the message, then hands it to IMAP for storage. When you interact with your messages (read, sort, delete, archive), you’re using the IMAP server. When you send email, you’re using the SMTP server.
The most popular SMTP servers by far are Exim and Postfix. The most popular IMAP servers are Courier and Dovecot.
The stack I’m most familiar with is Postfix + Dovecot. The frustrating thing about both these services is how tedious they are to configure. For a Linux beginner, it’s quite daunting to poke through the various configuration files and set up everything.
And sadly there are no good Docker packages for either platform.
But there’s a nice solution I’ve been using that simplifies a lot of this: Maddy is an all-in-one mail server that integrates the SMTP and IMAP service into a single daemon, plus includes some nice anti-spam features out of the box (DKIM, SPF, and DMARC). And here’s the best part, it’s Docker-native!
So here’s what we’ll do:
- Add a special container to reuse our Traefik SSL certificates
- Configure and start the Maddy container
- Add and define users for our email address
- Add a handful of special DNS entries to ensure proper email delivery
- Test using Thunderbird
SSL Certificates
In Reverse Proxies I showed the proper way to configure a reverse proxy called Traefik. Rolled into that package was a helpful feature that obtains SSL certificates from Let’s Encrypt and protects all of our internal services behind strong encryption. These same certificates will protect our email server, but we need to massage the format a bit. Traefik stores the certificates in JSON format, but Maddy expects them to be in PEM format. Same data, just different packaging. Luckily there is a helpful Docker container known as traefik-certs-dumper that will make the conversion for me.
I’ve added the following service to my /docker/traefik/docker-compose.yml file:
traefik-certs-dumper:
  image: ldez/traefik-certs-dumper:latest
  container_name: traefik-certs-dumper
  restart: unless-stopped
  entrypoint: sh -c '
    apk add jq
    ; while ! [ -e /traefik/acme.json ]
    || ! [ `jq ".[] | .Certificates | length" /traefik/acme.json` != 0 ]; do
    sleep 1
    ; done
    && traefik-certs-dumper file --version v2 --watch --source /traefik/acme.json --dest /traefik/certs'
  volumes:
    - certs:/traefik
Please note that certs is a named volume Traefik uses to save the acme.json file with my SSL certificates. Whenever it is updated, the traefik-certs-dumper container will convert and save them in PEM format to a sub-directory in that volume.
With this set up, I can simply attach it to my Maddy container and ensure that my certificates are always up-to-date.
Maddy Setup
I have created a special directory for this project, /docker/mail. The docker-compose.yml is:
version: "2"

services:

  maddy:
    image: foxcpp/maddy:latest
    container_name: maddy
    restart: unless-stopped
    ports:
      - "25:25"
      - "587:587"
      - "993:993"
    environment:
      - MADDY_HOSTNAME=mx.bowtieddevil.com
      - MADDY_DOMAIN=bowtieddevil.com
    volumes:
      - data:/data
      - /var/lib/docker/volumes/traefik_certs/_data/certs/certs/bowtieddevil.com.crt:/data/tls_cert.pem
      - /var/lib/docker/volumes/traefik_certs/_data/certs/private/bowtieddevil.com.key:/data/tls_key.pem

volumes:
  data:

networks:
  default:
    name: mail
When you write this file, be sure to change the MADDY_HOSTNAME and MADDY_DOMAIN environment variables. Also change the filenames for the bowtieddevil.com.crt (certificate) and bowtieddevil.com.key (private key).
Start Container and Set DNS Records
Bring the container up using docker-compose up -d and then execute the following commands as root (or use sudo):
devil@linodevm:/docker/mail# docker-compose exec maddy ls /data/dkim_keys
bowtieddevil.com_default.dns  bowtieddevil.com_default.key
devil@linodevm:/docker/mail# docker-compose exec maddy cat /data/dkim_keys/bowtieddevil.com_default.dns
v=DKIM1; k=rsa; p=MIIBIjANBgkqhkiG9w0BAQEFAAOCAQ8AMIIBCgKCAQEAuAvBKWU7SJedKpYeENgA3wAzrQdYxF/g65wa1GZONH4v+NTW/FKDen9oGeMdKqBzCCVcgb0w1yfGfmWSs1L1OORNfc95OQBECmBxzLqfvudjgkZhKQNmLKaLzzZFCFKh9KbUtcEZlWi1uICsdYiBCFnrVVex7iqHqvAEZQl9ifdLlBJB4bkxm6W5z1PlP4CLAq7Q3n/Ju2oMgfp+4SB2RGsK4nOw1I1AuLvwMN3a62JUjyRf/Bq5tl4jHTIQa/XYaAotwYcku1Le7AcWD/pm9OGo5i09PmqH1c2ve4PaExNpIUMukCg6h0rBlC0XgVgUFtuAZ3WawZQ9xmamA61UKwIDAQAB
This string of nonsense-looking text is a DKIM key, which is a special cryptographic signature that email servers will use to verify that an email was set by an authentic server that matches the DNS key. It’s not perfect (you could be compromised if you lost control of DNS and your private key) but it’s quite good.
Note that we don’t need DKIM to receive mail, but if we want to send email directly instead of using a Mailgun relay we’ll need this.
Move to the Linode Domain Control Panel and add a TXT record with the following values:
Hostname: default._domainkey
Value: <paste your DKIM key here>
TTL: Default
While we’re here, add a MX record to ensure that your new server is contacted first for all incoming mail.
Mail Server: mx.bowtieddevil.com
Preference: 1
TTL: Default
Subdomain: <leave blank>
Be sure to change your domain name appropriately, otherwise my server will get (and reject) your email.
Then save and you’re done!
Create Users
You can now create email addresses for your new server. Here I’ll create a devil user:
devil@linodevm:/docker/mail# docker-compose exec maddy maddyctl creds create [email protected]
Enter password for new user: ******
devil@linodevm:/docker/mail# docker-compose exec maddy maddyctl imap-acct create [email protected]
Repeat as needed for all email addresses you want to use on your new server.
Set up an Email Client
I will demonstrate how to interact with your new email server using Thunderbird, an open source email client by the team that developed Firefox.
Download and install the client, then start it up. It will ask you for information about your server. Add the email address and password that you just created, and Thunderbird will attempt to discover the correct settings. It likely will fail, so edit the settings as shown below (changing values as needed to match your domain):
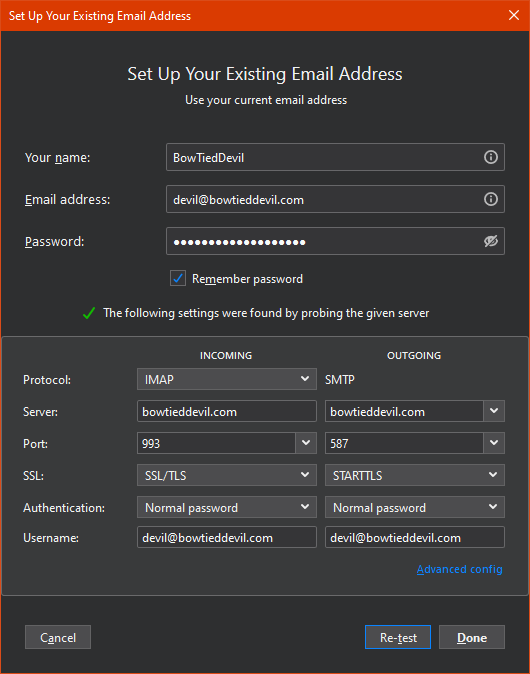
In this case, I have set Thunderbird to use my email server for receiving AND sending. This should work perfectly if you’re building on Linode, but if you’re doing something customized feel free to alter the sending (SMTP) server. You can use the values for Mailgun from the previous post on email sending.
Test
Now watch the logs using docker-compose logs -f maddy and send an email to your new account. You will see it received and stored, then you should get a notification from Thunderbird.
Hoorah, now you have a working email server!
I also recommend visiting Mail-Tester and sending a test email to discover how “spammy” your message appears to 3rd party services. If you’re getting a 10/10, you nailed it and can use your own server directly or keep using Mailgun to send.
Final Thoughts
Email is really complicated, but I believe it’s worthwhile to set up from scratch once. Even if you decide to use a 3rd party for your emails, it’s a great investment to understand how it all works and what goes on behind the scenes.